TerraformでS3、CloudFrontを構築してみよう!
こんにちは株式会社ベンジャミンの市川です!
暦の上では秋分も過ぎましたが、皆様お変わりございませんでしょうか。
今回は、弊社の案件でも利用しているインフラをコード化できるIaCの1つであるTerraformを使って、Amazon S3 & Amazon CloudFrontを作成してみましたので、その方法について書いていきます。
※注意※ 作成した後は必要に応じて、リソースを削除してください。
目次
- 環境情報
- 前提
- ユースケース & AWS構成図
- ディレクトリ構成
- 完成形(コード)
- 1.Terraformのバージョンを確認する
- 2.作成手順
- 3.リソースを削除する
- 4.コード補足 – 柔軟なポリシーを生成する
- 5.応用編 – 独自ドメインを使用する
- あとがき – WebサイトのS3 & CloudFrontにおけるユースケース
環境情報
- Terraform v1.4.4
- macOS Monterey 12.5
前提
- Terraform v1.4.4以上 がインストール済みであること
- AWSアカウントを持っていること
- アクセスキー、シークレットアクセスキーを発行済みであること
ユースケース & AWS構成図
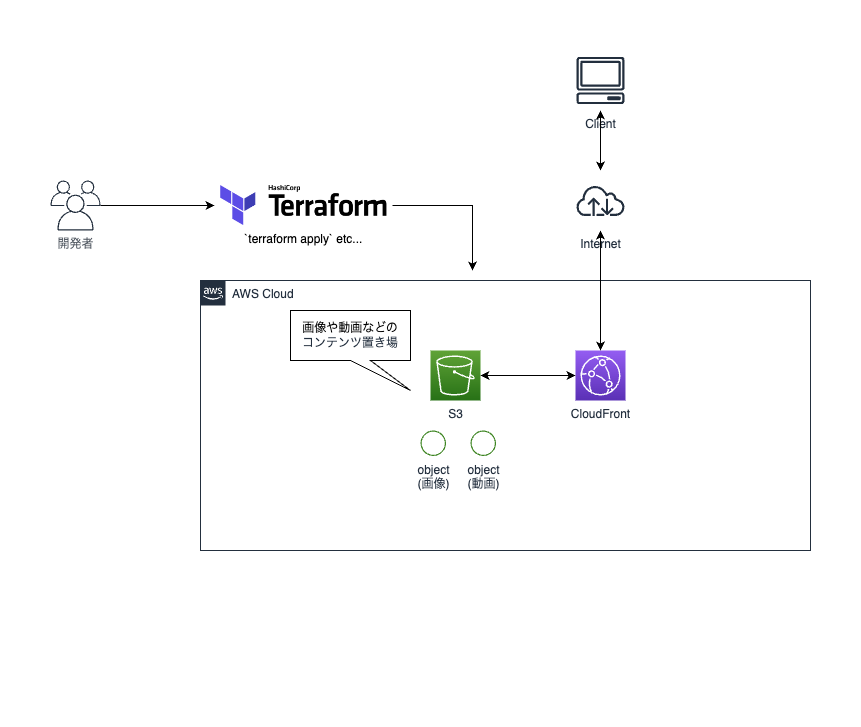
この記事で紹介するハンズオンのユースケースは、
- 画像や動画のコンテンツ置き場としてのS3を作成し
- CloudFrontでそれを配信する
を想定しています。
※Webサイトのホスティングをするユースケースであれば、今回紹介する手順のように自前でCloudFront+S3を構築するよりもAWS Amplify hostingを利用する方が便利です
ディレクトリ構成
最終的なディレクトリ構成は以下のとおりです。
root/
├ terraform.tfvars # 環境名、認証情報、リージョンを定義 ※必ずgit管理から外すこと
├ main.tf # 全体設定および/modulesのresourceに渡す変数の値を定義・呼び出し
└ modules/ # 各リソースのファイル
  ├ s3_cloudfront/ # リソースの性能・パラメータを定義したテンプレート。基本的にはいじらない(※1)
  │ ├ s3_cloudfront.tf # 呼び出した際に作成されるリソースを記述
  │ ├ variables.tf # s3_cloudfront.tfで使用する型情報、初期値などを定義
  │ └ outputs.tf # 他のリソースへ公開したい変数を定義
  └ policies/
     └ bucket_policies/
       └ bucket_policy.json.tpl # バケットポリシーのテンプレート
(※1 いじりたい値がある場合はvariableとして切り出し、main.tfから注入する)
完成形(コード)
今回のハンズオンで作成するコードです。
- terraform.tfvars
environment = "test"
access_key  = "XXXXXXXXXXXXXXXXXXXX" # ご自分のアカウントのアクセスキーに置き換えてください
secret_key  = "XXXXXXXXXXXXXXXXXXXXXXXXXXXXXXXXXXXXXXXX" # ご自分のアカウントのシークレットキーに置き換えてください
region = "ap-northeast-1"
bucket_name_prefix = "xxxxxxxxxxxxxxxxxxxxxx" # S3バケット名はグローバルに一意である必要があるため、他人と被らない値に置き換えてください- main.tf
variable "environment" { type = string }
variable "access_key" { type = string }
variable "secret_key" { type = string }
variable "region" { type = string }
variable "bucket_name_prefix" { type = string }

locals {
  service = "s3cloudfront-handson"
  service_codes = {
    kebabcase = "${var.environment}-${local.service}"
  }
}

terraform {
  required_version = ">=1.4.4"

  required_providers {
    aws = {
      source  = "hashicorp/aws"
      version = "4.60.0"
    }
  }
}

provider "aws" {
  access_key = var.access_key
  secret_key = var.secret_key
  region     = var.region

  default_tags {
    tags = {
      Environment = var.environment
      Service     = local.service
    }
  }
}

module "s3_cloudfront" {
  source = "./modules/s3_cloudfront"

  bucket_name = "${var.bucket_name_prefix}-${local.service_codes.kebabcase}-s3-filestorage"
  oac_name    = "${local.service_codes.kebabcase}-oac-filestorage"
  acl         = "private"
  policy_file = "${path.module}/policies/bucket_policies/bucket_policy.json.tpl"
}

output "cloudfront_domain_name" { value = module.s3_cloudfront.cloudfront_domain_name }- /modules/s3_cloudfront/s3_cloudfront.tf
resource "aws_s3_bucket_policy" "s3_policy" {
  bucket = aws_s3_bucket.default.id
  policy = templatefile("${var.policy_file}", {
    bucket_name    = var.bucket_name,
    cloudfront_arn = aws_cloudfront_distribution.cf.arn
  })
}

resource "aws_s3_bucket" "default" {
  bucket        = var.bucket_name
  force_destroy = true
}

resource "aws_cloudfront_origin_access_control" "default" {
  name                              = var.oac_name
  description                       = "S3のオブジェクトをインターネットへ配信するためのOAC"
  origin_access_control_origin_type = "s3"
  signing_behavior                  = "always"
  signing_protocol                  = "sigv4"
}

resource "aws_cloudfront_distribution" "cf" {
  comment = var.bucket_name

  enabled          = "true"
  http_version     = "http2"
  is_ipv6_enabled  = "true"
  price_class      = "PriceClass_All"
  retain_on_delete = "false"

  aliases = var.own_domain_name.aliases != null ? var.own_domain_name.aliases : []
  origin {
    domain_name              = aws_s3_bucket.default.bucket_regional_domain_name
    origin_id                = var.bucket_name
    origin_access_control_id = aws_cloudfront_origin_access_control.default.id
    connection_attempts      = "3"
    connection_timeout       = "10"
  }

  viewer_certificate {
    # 独自ドメインのACMを使用しない場合、デフォルトの証明書を使用する
    cloudfront_default_certificate = var.own_domain_name.acm_certificate_arn == null ? true : false

    # 独自ドメインのACMを使用する場合、証明書を指定する
    acm_certificate_arn = var.own_domain_name.acm_certificate_arn == null ? null : var.own_domain_name.acm_certificate_arn

    ssl_support_method       = "sni-only"
    minimum_protocol_version = "TLSv1"
  }

  default_cache_behavior {
    allowed_methods        = ["GET", "HEAD"]
    cached_methods         = ["GET", "HEAD"]
    compress               = "true"
    default_ttl            = "60"
    max_ttl                = "60"
    min_ttl                = "60"
    smooth_streaming       = "false"
    target_origin_id       = aws_s3_bucket.default.id
    viewer_protocol_policy = "allow-all"

    forwarded_values {
      query_string = false

      cookies {
        forward = "none"
      }
    }
  }

  restrictions {
    geo_restriction { // 地理的制限
      restriction_type = "none"
    }
  }
}- /modules/s3_cloudfront/variables.tf
variable "own_domain_name" {
  type = object({
    acm_certificate_arn = optional(string)
    aliases             = optional(list(string))
  })
  default = {
    acm_certificate_arn = null
    aliases             = null
  }
}

variable "bucket_name" {
  type    = string
  default = "test-example-s3"
}

variable "oac_name" {
  type    = string
  default = "test-example-oac"
}

variable "acl" {
  type    = string
  default = "private"
}

variable "policy_file" {
  type = string
}- /modules/s3_cloudfront/outputs.tf
output "s3_bucket_id" { value = aws_s3_bucket.default.id }
output "s3_bucket_regional_domain_name" { value = aws_s3_bucket.default.bucket_regional_domain_name }
output "cloudfront_domain_name" { value = aws_cloudfront_distribution.cf.domain_name }
output "cloudfront_aliases" { value = aws_cloudfront_distribution.cf.aliases }
output "cloudfront_arn" { value = aws_cloudfront_distribution.cf.arn }
output "cloudfront_hosted_zone_id" { value = aws_cloudfront_distribution.cf.hosted_zone_id }- /policies/bucket_policies/bucket_policy.json.tpl
{
  "Version": "2008-10-17",
  "Id": "PolicyForCloudFrontPrivateContent",
  "Statement": [
    {
      "Sid": "AllowCloudFrontServicePrincipal",
      "Effect": "Allow",
      "Principal": {
        "Service": "cloudfront.amazonaws.com"
      },
      "Action": "s3:GetObject",
      "Resource": "arn:aws:s3:::${bucket_name}/*",
      "Condition": {
        "StringEquals": {
          "AWS:SourceArn": "${cloudfront_arn}"
        }
      }
    }
  ]
}
1.Terraformのバージョンを確認する
まず、Terraformがインストール済みであるか、かつバージョンがv1.4.4以上であるかを確認しておきます。次のコマンドを実行し、確認してみましょう!
terraform --version- 実行後、以下の例のように出力されていればインストールできています。
xxxxxxxxx@xxxxxxxxMacBook-Pro handson % terraform --version
Terraform v1.4.4
on darwin_arm64
2.作成手順
※※ あらかじめ、完成形で説明した各ファイル(コード)を作成しておいてください ※※
TerraformからAWSリソースにアクセスするためのクレデンシャル情報(リソース作成・削除の実行権限があるアカウントの)を設定していきましょう。以下のファイルを編集し、アクセスキーとシークレットキーをご自分のものに置き換えてください。
また、S3バケット名はグローバルに一意である必要がある(複数人がそのまま実行した場合、二人目以降はS3のバケット名の衝突でエラーになる)ため、`bucket_name_prefix` も他人と被らない値に置き換えてください。
(※ 使用できる文字種には制限があります。こちらの公式を参考にしてください。)
- terraform.tfvars
environment = "test"
access_key  = "XXXXXXXXXXXXXXXXXXXX" # ご自分のアカウントのアクセスキーに置き換えてください
secret_key  = "XXXXXXXXXXXXXXXXXXXXXXXXXXXXXXXXXXXXXXXX" # ご自分のアカウントのシークレットキーに置き換えてください
region = "ap-northeast-1"
bucket_name_prefix = "xxxxxxxxxxxxxxxxxxxxxx" # S3バケット名はグローバルに一意である必要があるため、他人と被らない値に置き換えてください
作業ディレクトリの初期化、必要なプラグインのインストールするため、ターミナルから以下のコマンドを実行しましょう。
terraform initリソースを作成する前の確認作業として、.tf ファイルに記載された情報から、どのようなリソースが作成 / 修正 / 削除されるかを確認しておきましょう。次のコマンドを実行します。
terraform plan- 実行後、以下のように出力されているはずです。「Plan: 4 to add」で分かる通り、main.tfに記載されたリソースの作成が計画されていることが分かります。
# 出力結果
Terraform used the selected providers to generate the following execution plan. Resource actions are indicated with the following symbols:
  + create

Terraform will perform the following actions:

~~~省略~~~

Plan: 4 to add, 0 to change, 0 to destroy.
実行計画を確認できたところで、実際にAWS環境にリソースを作成してみましょう。
次のコマンドを実行してください。
※ -auto-approve オプションを付けることで、コマンド実行前の確認「yes」の入力が不要になります
terraform apply -auto-approve- 実行後、以下のように出力されていれば無事にリソースの作成ができています。
Plan: 4 to add, 0 to change, 0 to destroy.
module.s3_cloudfront.aws_cloudfront_origin_access_control.default: Creating...

~~~省略~~~

Apply complete! Resources: 4 added, 0 changed, 0 destroyed.

Outputs:

cloudfront_domain_name = "xxxxxxxxxxxxxx.cloudfront.net"
作成後、ブラウザからAWSコンソールにアクセスしてCloudFrontとS3が作成されていることを確認しましょう。
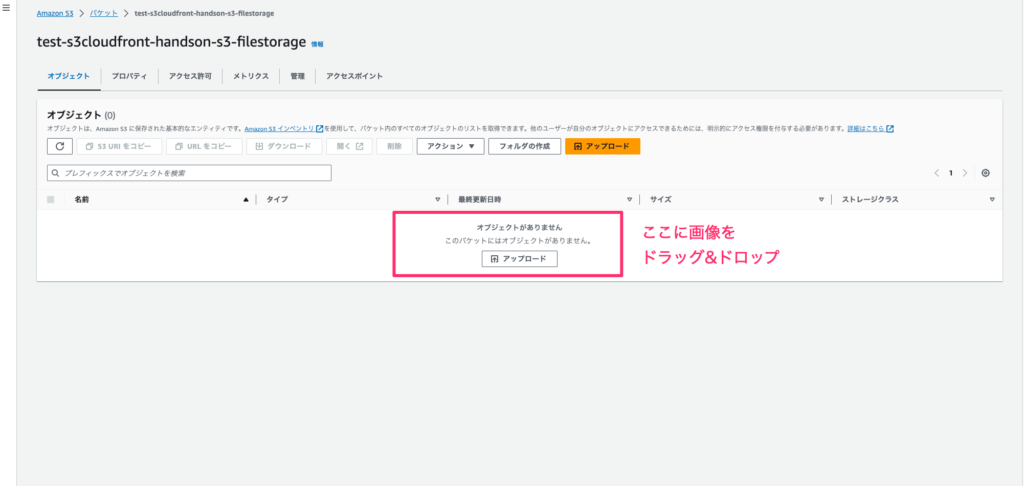
S3のページを開き、適当な画像ファイルをドラッグ&ドロップします。
(例:image.png)
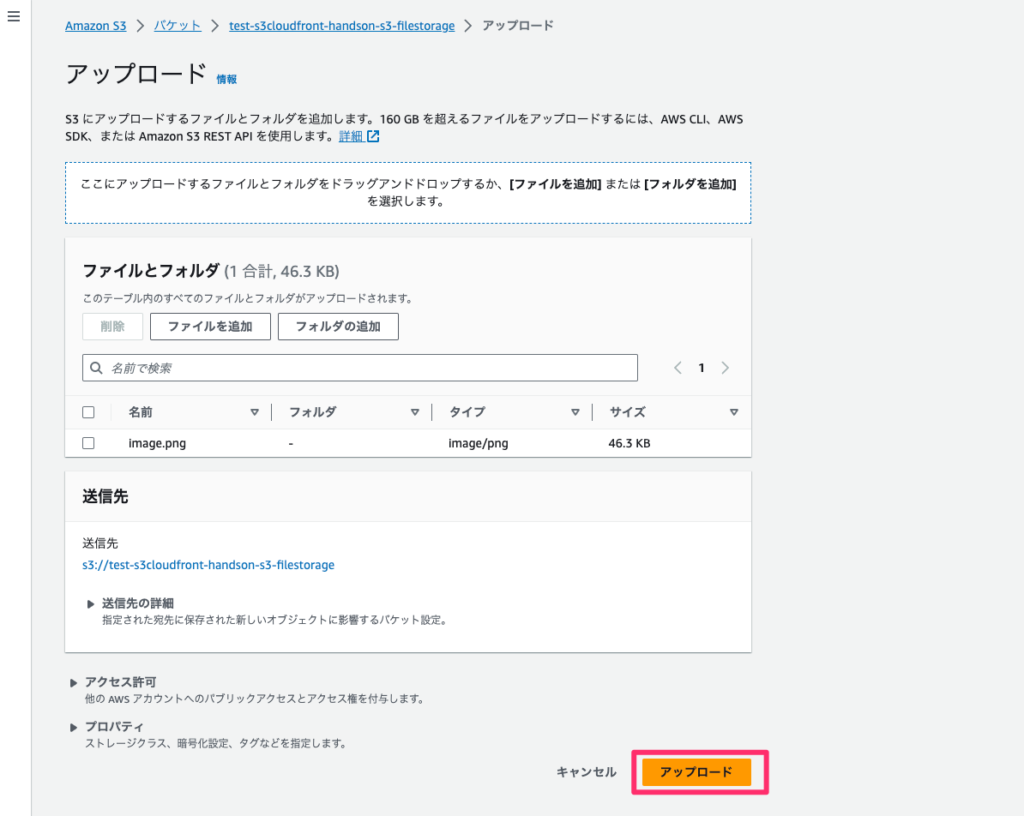
「アップロード」をクリックします。
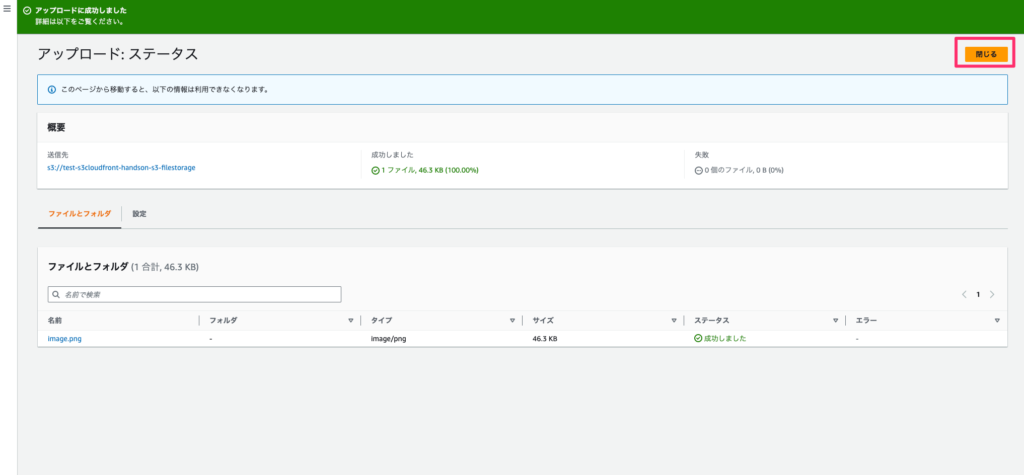
アップロードに成功したことを確認し、「閉じる」をクリックします。
ターミナルに戻り、以下のコマンドを実行します。
terraform output- main.tfに記述したoutput変数(ドメイン名)が出力されるので、それをコピーします。
xxxxxxxxx@xxxxxxxxMacBook-Pro handson % terraform output
cloudfront_domain_name = "xxxxxxxxxxxxxx.cloudfront.net" # ← これをコピーブラウザに戻り、新しいタブを開き「コピーしたドメイン名/アップロードした画像ファイル名」とURLを入力しアクセスします。
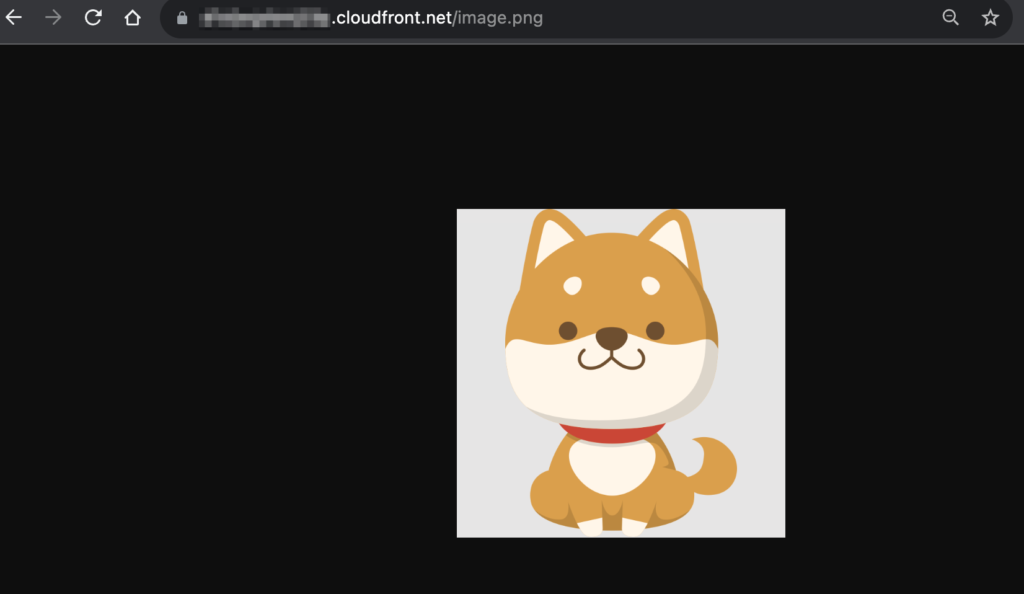
(例: xxxxxxxxxxxxxx.cloudfront.net/image.png)
無事に表示されていれば、S3のオブジェクトをCloudFrontで配信できています!
3.リソースを削除する
Terraformでリソースを作成しました。必要がなければ、稼働料金がかかってしまわないように、全て削除してしまいましょう。以下のコマンドを実行してください。
terraform destroy -auto-approve4.コード補足 – 柔軟なポリシーを生成する
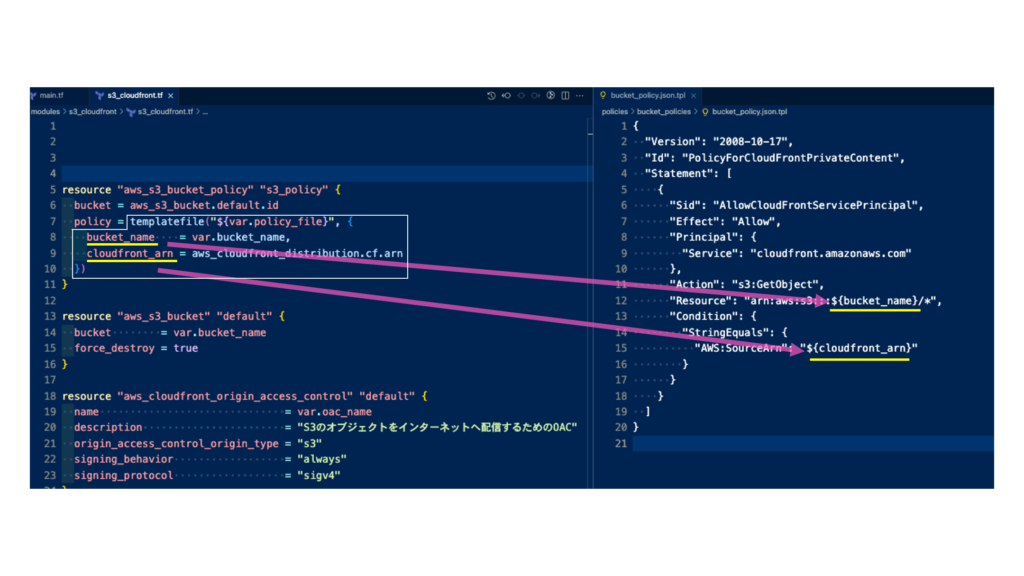
柔軟に変更できるバケットポリシーを作成するため、Terraformのテンプレート機能(templatefile関数)を使っています。これを使えば、bucket_policy.jsonをテンプレート化し、変更したい箇所をTerraformから変数で渡して作成することができます。
※ Template Provider (`data “template_file” “foo” {…}`) という書き方もありますが、M1・M2 Macに対応していない(?)、かつ公式非推奨のため使っていません
(参考:https://registry.terraform.io/providers/hashicorp/template/latest/docs)
- /modules/s3_cloudfront/s3_cloudfront.tf (一部抜粋)
resource "aws_s3_bucket_policy" "s3_policy" {
  bucket = aws_s3_bucket.default.id
  policy = templatefile("${var.policy_file}", { # ← ココ
    bucket_name    = var.bucket_name,
    cloudfront_arn = aws_cloudfront_distribution.cf.arn
  })
}
5.応用編 – 独自ドメインを使用する
【前提】
・ACMを使用している かつ ワイルドカード証明書(例: *.xxxxxxxxxxxxxx.com)をus-east1リージョンに発行済み
・Route53を使用している かつ ホストゾーンを作成済み
独自ドメインを使用する場合は、以下を参考にコードを追加したあと、`terraform apply` を実行してください。今回は、サブドメイン `filestorage.` を付加しています。
- main.tf
~~~省略~~~

module "s3_cloudfront" {
  source = "./modules/s3_cloudfront"

  bucket_name = "${var.bucket_name_prefix}-${local.service_codes.kebabcase}-s3-filestorage"
  oai_name    = "${local.service_codes.kebabcase}-oai-filestorage"
  oac_name    = "${local.service_codes.kebabcase}-oac-filestorage"
  acl         = "private"
  policy_file = "${path.module}/policies/bucket_policies/bucket_policy.json.tpl"

  // ★追加部分1
  own_domain_name = {
    acm_certificate_arn = data.aws_acm_certificate.host_domain_wc_acm_cloudfront.arn
    aliases             = [local.domain_names.filestorage]
  }
}

output "cloudfront_domain_name" { value = module.s3_cloudfront.cloudfront_domain_name }

// ★追加部分2(以下全て)
locals {
  host_domain = "xxxxxxxxxxxxxx.com" // ← ご自分のドメインに置き換えてください
  domain_names = {
    filestorage = "filestorage.${local.host_domain}"
  }
}
# ACM証明書用のプロバイダーを作成 ※ CloudFrontはus-east1の証明書が必要
provider "aws" {
  alias  = "virginia"
  region = "us-east-1"
}
# 発行済みのACMワイルドカード証明書をTerraformにインポートする
data "aws_acm_certificate" "host_domain_wc_acm_cloudfront" {
  provider = aws.virginia
  domain   = "*.${local.host_domain}"
}
# 作成済みのRoute53ホストゾーンをTerraformにインポートする
data "aws_route53_zone" "host_domain" {
  name = local.host_domain
}
# Route53にAレコードを作成する
resource "aws_route53_record" "filestorage" {
  zone_id = data.aws_route53_zone.host_domain.zone_id
  name    = local.domain_names.filestorage
  type    = "A"

  alias {
    name                   = module.s3_cloudfront.cloudfront_domain_name
    zone_id                = module.s3_cloudfront.cloudfront_hosted_zone_id
    evaluate_target_health = false
  }
}
実行後、少し待ちます(およそ5分〜20分以上)。
ブラウザで「filestorage.独自ドメイン名/アップロードした画像ファイル名」とURLを入力しアクセスし、画像が表示されていれば完了です。
(例: filestorage.xxxxxxxxxxxxxx.com/image.png)
あとがき – WebサイトのS3 & CloudFrontにおけるユースケース
今回のハンズオンはコンテンツ置き場としてのS3 & CloudFrontでした。
Webサイトのユースケースの場合、SPA・SSGごとに合わせたリライト設定、Basic認証、独自ドメインを指定する際のACM証明書発行、Route53ホストゾーン作成など手作業で行う必要があるため、それらをコンソールぽちぽちするだけでよしなにやってくれるAmplifyで対応するのがベストだと感じました!
以上、この記事が皆様のお役に立てれば幸いです。それでは。

